Starting A7R2 is almost no consideration, so from the product release to pre-sale, can not wait to recharge credit card. Prior to this, I had successively had SONY A6000, SONY A7, SONY A7M2, Canon 5D MARK II, and Canon 5D MARK III. In short, in any case, I seem to be completely unable to jump 2000W this level pixel curse, so I urgently want to experience high-pixel, low-pass thrill, so that the camera's picture quality has a qualitative leap. And this time A7R2 appeared before me, not too late. Have it, from the very beginning of ecstatic, to the present passions retreat. In this year of deep use, A7R2 gave me a lot of surprises beyond expectations, but also some uncomfortable weaknesses. A thousand words, I have too many words to say. But I don't know where to start, so the 10,000 words may be logically chaotic. I hope everyone will not be surprised to hear me slowly.
The first chapter talk about the shortcomingsNo camera is perfect, as is the A7R2. The seller is always better than the buyer, and even the A7R2, which is claimed to be the flagship of Sony's full-frame format, still has some obvious shortcomings. But in my opinion, these short boards can obviously be easily compensated for, perhaps just for the so-called product differentiation, hard-boiled A7R2 to make a special prostitute. A7R2 has very obvious advantages, but his shortcomings are equally maddening. So when you understand the strengths of A7R2, let us first take a look at his shortcomings.
1, photos written too slowly.
According to third-party testing, the write speed of A7R2 is only about 40M/S. As a 4240W pixel machine, a compressed RAW is about 40M, uncompressed RAW is 80M, which means that taking a RAW needs to wait 1~2 seconds to write. In addition, the A7R2 must be able to view the playback after the photo is written to the SD card. This results in a very poor shooting experience for the A7R2. In particular, shooting faster tempo shooting, such as sports capture, fast-paced continuous shooting after more than two dozen (A7R2 fuselage cache can only support compressed RAW continuous shooting 21), you want to playback photos collapse, endless "Photos are... Storage is waiting. So this kind of constipation shooting experience is really crazy. Obviously the model released in 2015, but does not support the USH-II format SD card. It is obvious that Sony owns the XQD of Niubi, but it does not add to the A7R2. Perhaps this is because the positioning of the A7R2 is a picture quality machine, so even if Sony's stubborn writing speed is slower, consumers can accept it.
2, no touch screen.
Once the touch screen is a low-end machine features, and now Canon 1DX2, 5D4, Nikon D5 have joined the touch screen, who dares to say that the touch screen is a low-end machine patent? In particular, the 399-point machine of the A7R2, through the back of the arrow keys to move about to focus, really collapsed. Some people said to give a rocker, but I think the efficiency of the rocker is still far less than the touch screen. Imagine if you join the "touch release shutter" feature on your smartphone or Canon 1DX2. Cool or not?
3, low battery life.
If micro-single was originally intended, in order to make the volume as small as possible, it would have to compress the battery capacity. But now for the professional level of quality, more and more shots weighing more than 600g appear, if the body and weight of the compressor body, the significance is really small. The FW50's battery, designed to meet the APS-C format, is still OK. Now that the full-frame A7 series has reached the second generation, various large-sized GM and ZA series lenses have come one after another. Honestly, I can hardly believe that the 1080mA FW50 battery can also handle the FE70 200 2.8GM giant lens. So I'd rather the A7R2 do 700g from 582g and raise the battery from 1080mA to 2000mA. Such a battery can almost meet my normal shooting workload for a day.
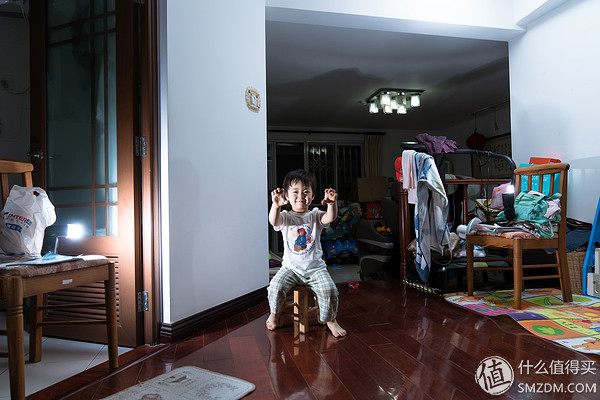
Here is a little knowledge. Micro battery life and SLR is different, the number of SLR shooting a battery is a very stable number, but micro-single, and shooting habits have a great correlation. Using the EVF (electronic viewfinder) requires power, and using the LCD (liquid crystal display behind the camera) will save power. The camera is on, even if it is not shooting it consumes electricity. Therefore, it is possible for the A7R2 to shoot from 240 to 700 shots. After I've developed a close-to-hand-off habit like me and try to shoot with an LCD, a battery can easily capture 700 shots. Many people think that the micro-continuing route is poor because it has seen only two or three hundred figures in official paper and has not actually tried it. A7R2 battery life is poor, but not so bad.
4, no 4D focus.
4D focusing is Sony's most advanced focusing technology, however, 4D focusing only appears on the A5100, A6000, A6300 and other half bodies, but the full-frame flagship A7R2 does not. I believe that Sony definitely has the ability to add 4D focus to the A7R2, just as the A99II was recently released. Of course, this may be prepared for the legendary A9. In short, A7R2 body is no black technology in one.
5, behind the flash system.
The flash setting menu in the A7R2 is really simple. Only basic settings such as forced flash, rear-curtain sync, wireless flash, low-speed sync, and flash exposure compensation are fundamental. The flash's automatic or manual, output power, grouping, light ratio, strobe, surround flash all these features. Even with the flashing program, the original factory still falls behind. The recently released wireless flash triggers and receivers are still not listed. Frankly, even if it is listed, it will still lag behind. With this flash built-in receiver, only one flash unit is required on the top to remotely control all flash units. The 1+N (1 flash unit + N receivers) flash scheme is really LOW. Fortunately, the sales volume of the A7R2 is bullish, and more and more sub-factories have begun to join the flashing lights of the Sony system. Therefore, Nisshin and Shenniu's Sony-specific flashlights appeared on the hot shoe side. A7R2's lagging flash stroking scheme actually needs to be compensated by an auxiliary factory. At present, it can only hope that in the future more and more deputy plants will launch Sony's system flash, giving consumers more choices.
Chapter 2 New Operational HabitsIf you can accept the previous shortcomings, then the advantages behind will definitely give you a powerful surprise. Although the A7R2 is constipated (slow writing), rough skin (no touch screen), and physical weakness (differential sailing), the black technology owned by the A7R2 is equally astonishing. Like Lin Yuyu, although the physical quality is a little worse, but people have high facial expressions. So even if the A7R2 has such a shortage, but his many black technology is enough to change the shooting habits of traditional cameras.

1, eye control + center-based focusing mode
Since the subjects I shoot are basically portrait-oriented, the focus is mainly on eye-control focusing, and then assisted with the center-point focusing composition translation method, which is sufficient to meet my shooting needs. And in the shooting process, there is no need to frequently change the focus mode, and only two custom shortcut keys are needed to satisfy the demand.
Because of the characteristics of the WYSIWYG WYSIWYG, the AEL exposure lock function is no longer useful, and the position of this key is particularly suitable for the operation of the thumb focus and the middle finger shutter. It is definitely the most convenient operation method on the A7R2, so replace the AEL key with More practical black technology: eye focus (eye control AF, Sony's Chinese translation is really misleading. Many people mistakenly believe that eye-control AF, is the focus of the eye control, eyes look like. Actually not the case, Should be translated into eye focus, the camera's ability to focus directly on the eye). The central key is set to focus on the center point, which is the so-called standard (another collapsed translation, obviously center focus, why call the standard, why, why, why ...)

The AEL key performs eye focus, and the center key achieves center focus. For many users who were already accustomed to focus and shutter separation, this is easy to use. However, some users who were accustomed to half-pressing the shutter focus will need time to adapt to this new operating habit. As for the benefits? Focusing on the eye is definitely Sony's most practical black technology.
1.1 Eye Focus
Focus on the eye, an addictive black technology that people use. Sony A7 has already provided eye-control focus function, the camera will automatically recognize the position of the human eye to focus, eliminating the need to focus on the tedious operation, concentrate on shooting. However, the A7 only supports single focus, and it can only be used when it is placed. It does not make much sense. But the A7R2 can be different, support continuous focus mode, instantly let the eye focus function from a non-mainstream tasteless, improved to become my main focus means.
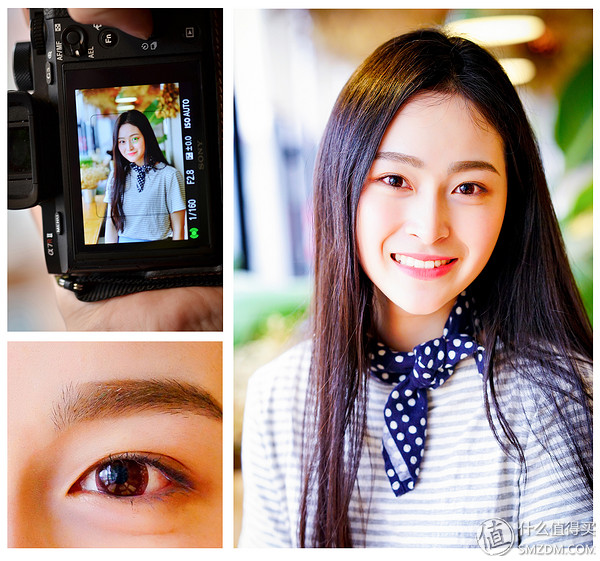
When I shot this example picture, I was still using the camera's default center key to focus the eye, which was really uncomfortable. However, after changing the AEL button to control the focus of the eye, the world is in a beautiful moment. Perhaps such a sample shot can not reflect the focus of the eye focus, so I give an example.
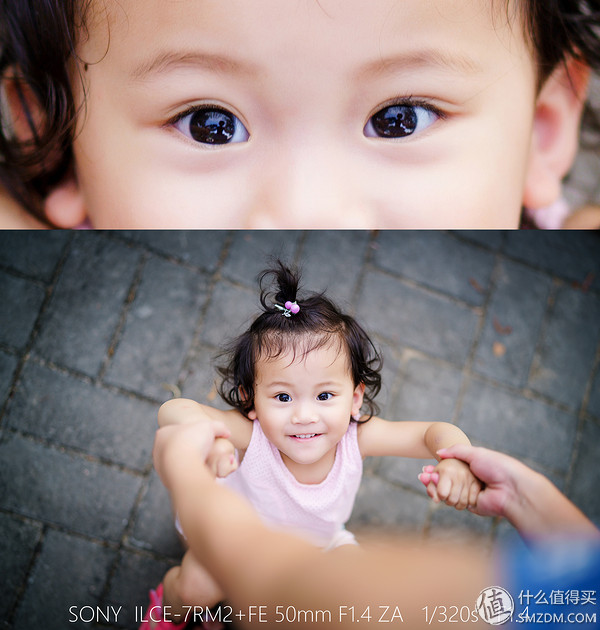
This picture is a snapshot of a little girl pulling her mother's hand and spoiling her eyes as the child looks up at the camera. Focusing on the eye from the beginning to the end of the eye, I waited until I found the moment to press the shutter.
How do you manage to get more people in the same box? Maybe someone has to ask, the photos you give are all taken by a single person. What do you do when many people are in the same frame? What if the eye's focus is on the passerby's eyes? It does not matter, A7R2 also has a solution: face registration. You can register the face of your priority shot in advance so that no matter how many individuals appear on the screen at the same time, the target you are looking for is also preferentially searched for eye focus.

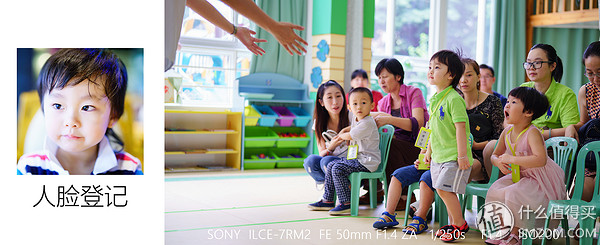
With the support of the face registration function, no matter how many people appear in the lens, the eyes of the A7R2 are only you.
The limitations of eye focus. Of course, focusing on the eye is not a panacea. In many cases, focusing on the eye is impossible. The principle of eye focus is to recognize the face first and then the eye. Therefore, when an important feature such as the face, the nose, or the mouth of the face is occluded, the face cannot be recognized, and the eye cannot recognize the focus. Or if the proportion of the face occupied by the picture is too small and the facial features are not obvious, the eyes cannot be recognized. Or is it a back-to-back lens? When you have the back of your head, the eye can't focus.

In fact, in addition to the above-mentioned situations, there is another situation that is not applicable, that is, shooting on the fly. The object distance changed too quickly and the eye recognition could not keep up. However, this is more because it is limited by the camera's focusing performance, not the eye recognition function itself, so after thinking about it, it is still not included in this limited scope.
1.2 Center focus, translation composition
This method is very familiar to everyone, and there are still a large number of users to maintain this mode of operation. The A7R2 can set a dedicated shortcut for center focus: the center key. When you operate, you do not need to enter the menu frequently to change the position of the focus area. Instead, you can directly press the center button to achieve this.
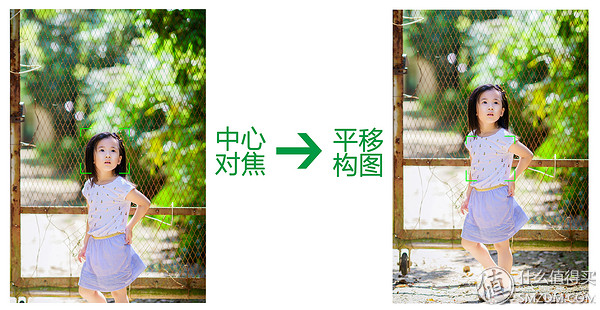
Focusing at the center, the translational composition can be used as a good complement to the eye focus, to make up for the lack of eye focus. (The situation in the example picture is also suitable for focusing on the eye, but it is just a picture of the author that he has taken to create a focus-translation composition.) Most importantly, the center focus is the simplest focus from the eye on the A7R2. Switch to the center point for focusing. In the custom setting described above, the AEL controls the focus of the eye and the center key controls the focus of the center.
Focus on the limitations of the center. No focusing method is perfect, so the center focus is also limited. The most famous is the cosine error. When shooting a large aperture, the center focuses on the eye, and then translates the composition. The eyes are absolutely blurred. Because of the process of translational composition, focal length error, the so-called cosine error, is caused.
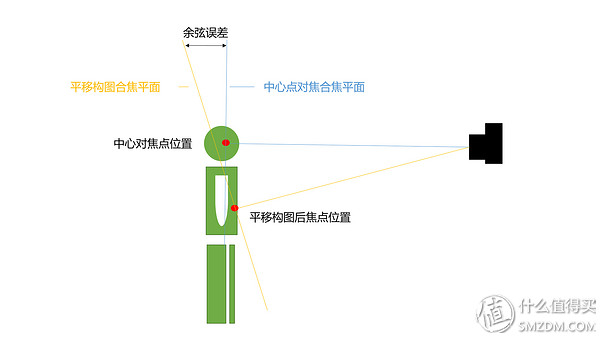
The above example diagram is to illustrate the cosine error, the painting is rough, I hope everyone can read it. In addition, the motion capture is not suitable for the center-focus translation composition, because the focus of the moving object constantly changes, focusing is very difficult, not to mention the time of the translation composition.
1.3 Summary of this section
Eyes + center This focusing method can basically satisfy most of the subjects. In particular, the author usually shoots portrait subjects, and the eye focus is almost toxic. After use, it can no longer be stopped. Of course, the focus of the eye can not be competent, so with the center focus translation composition, almost perfect. Why is it said that because even if these two methods cooperate, there are situations in which they are incompetent, so they need to be free to focus on the choice.
2, super wide focus area selection
As mentioned above, when there was no touch screen support, the choice of 399 focus points persisted in the collapse. However, no matter how it collapses, when shooting is needed, the trouble must be switched to the free focus point. Fortunately, the focus of the A7R2 is not just a lot, but more importantly, his focus coverage area is wider, perhaps the most widely used camera in the full-frame camera. Of course, I may be ignorant and I hope everyone corrects.

Looking for a screenshot of the official website's promotional video, you can clearly understand the A7R2's powerful focus area. The green square represents 399 phase pairs and the 25 blue boxes represent the contrast detection focus. Generally speaking, focusing in the green area is very fast and accurate; in the blue area outside the green area, focusing is slow but accurate; outside the blue area, focusing is not possible.

Although many people do not care about the coverage area of ​​the focus, in actual shooting, they are often subtle and limited by the camera's focus coverage area. That is, the composition is often unconsciously limited in the coverage area of ​​the camera's focus point during shooting. One of the most obvious cases is that when you look at Canon 5D2, 6D users, you will find that they have a lot of center composition in the photos they take. Because they rely too much on the center point of focus, which leads to the inertia of the compositional thinking without knowing it. Although the composition can be translated through the center point, cosine errors are also a concern. Therefore, the subconscious is often consciously using the center composition directly. Of course, there is nothing wrong with the composition of the center, but photography should be more unrestrained. So a broader focus coverage area means more flexible composition space. For example, such an exaggerated edge composition is illustrated, and the free focus point of the A7R2 has better room to play.
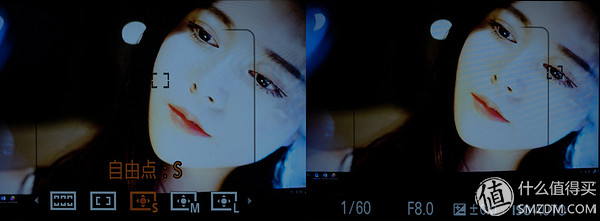
The A7R2's free focus selection is available in large, medium and small sizes. The smaller the focus, the more accurate the focus. But the price paid is that the focusing speed is reduced, so under normal circumstances, as long as the focus area allows, I try to select the “big†one.
3, intelligent capture experience
It is true that the A7R2 is not top-notch in focus speed. But in terms of ease of capture, the A7R2 is absolutely top-notch. Smart focus, once the focus on the target, you can hold it tightly. 399 Phase + 25 Contrast each other one by one and focus firmly on the target without technical difficulty. Although other machines also have similar smart focusing technologies, there are generally dozens of focus points, and the density is not enough. It is easy to lose the target. Therefore, these models need to manually keep the focus as far as possible from the target when capturing, and the technical difficulty is improved a lot.

Intercepted a screenshot from the official website's promotional video. Although the A7R2 has no so-called 4D focusing technology, the actual shooting is still very powerful. At least based on my real shooting experience, I feel even more successful than the A6000's 4D focusing, just a bit weaker than the A6300's 4D focus. Therefore, in the E-port machine, the A6300 is the best, followed by the A7R2, but it will not be too much. Of course, lack of professional instrument testing, personal subjective feeling is not accurate, so my conclusion is for reference only.
When capturing the A7R2, wide-area focus + AF-C + turn on or off face recognition is generally used. When the object being photographed is not moving at a high speed, open face recognition is harmless, because the focus is more accurate. However, it is best to turn off face recognition when the subject being photographed moves too fast. Because of this, face recognition often fails to follow, resulting in inability to focus. However, when face recognition is turned off, there is no guarantee that focus can reach the face, let alone focus on the eyes. How to do it? My approach is to reduce the aperture so that the focus can reach the point where the depth of the field is sufficient to cover the whole body. After such treatment, the success rate of motion capture can be increased to almost 100%.
SONY ILCE-7RM2+FE 16-35mm F4 ZA OSS 1/400s F5 ISO640 16.0 mm

SONY+ILCE-7RM Switch Canon EF24-70mm F2.8 L II 1/640s F3.2 ISO250 70.0 mm
The above two snapshots are all of which I have reduced a certain amount of aperture to ensure that there is enough depth of field to cover the entire body. At this time, even if I turned face recognition off, it doesn't matter which part of the body I choose to focus on, so just make sure it's on the body. Of course, the camera is dead, and the A7R2 sometimes chooses the wrong focus, so the key to sport capture is here. When the focus point selection is wrong, release the shutter, press the shutter button halfway again, and let the camera select the focus target again until it is correct. Once the focus point is selected correctly, press the shutter lock target halfway, the camera will firmly grasp the target, and then start shooting. This point is particularly critical, many people have A7R2, but the success rate of capture is always low, which is a big reason. Be sure to focus on the target before you start shooting.
4, the simplest M file
The mobile phone is the largest photography tool for the current photography audience. Maybe you don't necessarily own a camera, but you must have used a mobile phone to shoot. So for most ordinary consumers, the mobile phone is the most simple and easy to use shooting tool. This group of people, after purchasing a professional SLR, often falls into a situation where cameras are not as good as mobile phones. For the ultimate reason, the SLR is too professional and too complicated. It is really unfriendly to beginners. So for all rookie photography zero-based, I like to recommend micro-single. One of the most important is that the mode of operation of the micro-single is closest to the mobile phone, which is the so-called "What You See Is What You Get". Consistent with the input and output results, any adjustment of the parameters on the camera will be directly reflected on the camera screen, just like the camera function in a mobile phone that everyone will use. No professional training is required to get started. And this seemingly inconspicuous "what you see is what you get", after digging deeper, you will find that the change of camera control can even be said to be revolutionary. Perhaps the EVF technology of early cameras was not mature enough, the picture quality was not enough, the magnification was not enough, and there was a serious time lag. But now with the development of technology, the display effect of EVF has become more and more delicate, and the time lag is getting smaller and smaller. The A7R2 is such a machine with 2.36 million effective pixels, 0.78 magnification, Zeiss T coating. Maybe you have no idea about these numbers. In simple terms, it is clear, bright and transparent. But these are not the focus, really below:
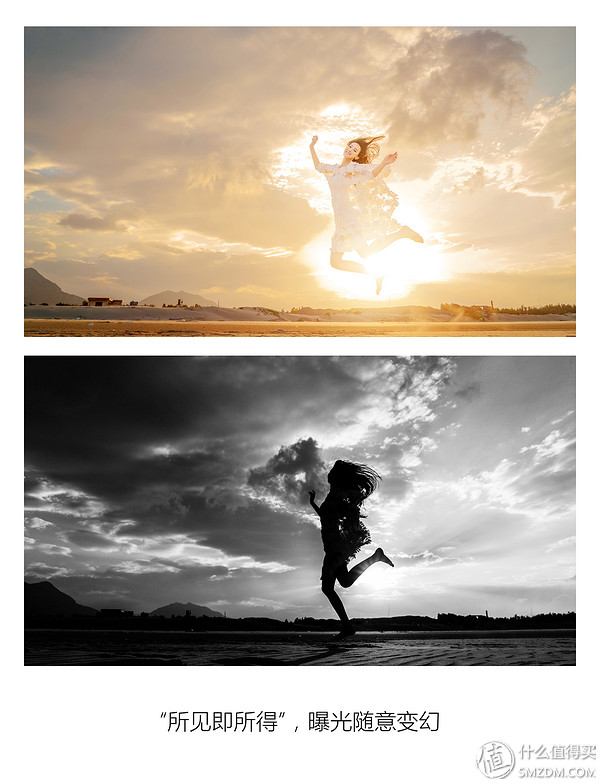
4.1 Exposure
“Excuse me, what kind of metering mode do you use for this photo?†This is probably one of the most common problems with photographers. It is as if everyone likes to ask “What camera, what lens, what parameters do you use for this picture? ?". It can be seen that the problem of "light metering mode" at least plagued a large part of users. What kind of shooting environment, what kind of metering mode, how much exposure compensation should be given, in a very long period of time this is a photographer must master basic skills. The so-called accurate exposure is a basic skill that can be mastered by a large amount of filming experience and accumulated over time in the past. But A7R2 does not need, "WYSIWYG", white minus black, watching EVF to adjust the brightness of the photo can be. So for A7R2 users, I strongly recommend that you use the M file. Maybe you used to stay in A or other stalls. Maybe it was a bit difficult for you to use the previous M file, and you won't be able to accurately set the aperture, shutter, and ISO settings at a time. You need to test it several times to find the right exposure parameters. With the A7R2, you will find that everything has become too simple, watching the light and darkness inside the EVF to adjust the aperture, shutter, ISO, to ensure one-time, accurate exposure. If someone later asks you what metering mode to use, you can be proud to say that I use the human eye to meter light.
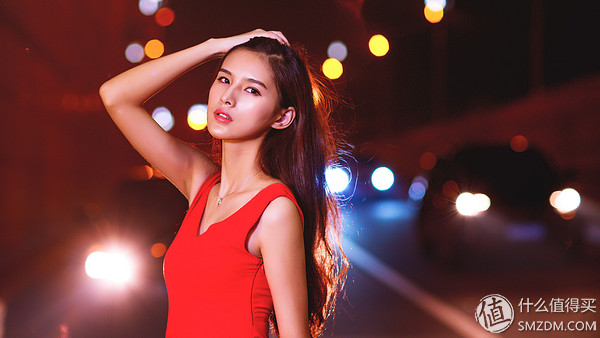
SONY ILCE-7RM2+FE 70-200mm F4 G OSS 1/125s F7.1 ISO640 169.0 mm
With the support of WYSIWYG, no matter how complex the environment is exposed, accurate exposure can be achieved. In fact, when I was shooting today, my idea was not to stop at how to make people shine. It was such a simple matter. Instead, it is in consideration of what range of highlights and shadows should be controlled to meet the requirements for later revision of A7R2. In simple terms, it is how I get a highlight and shadow in the middle of the exposure for exposure, so that I can use RAW tolerances later to retrieve these details.
4.2 Depth of field
Depth of field refers to the distance the camera can take. The three factors that affect the depth of field are object distance, focal length, and aperture. Although the traditional SLR also has the function of depth preview, it is not as convenient as "what you see is what you get." For example, when I use a 55-lens camera, and a half-length portrait of a 1.60-meter sister paper is slightly photographed, how much aperture is needed to allow the depth of field to cover the models' eyes without causing one eye and one eye. In the past, this required relying on a lot of actual shooting experience to make judgments, but A7R2 does not need to. "WYSIWYG," watching the EVF adjust the aperture until you think the model is clear at the same time.
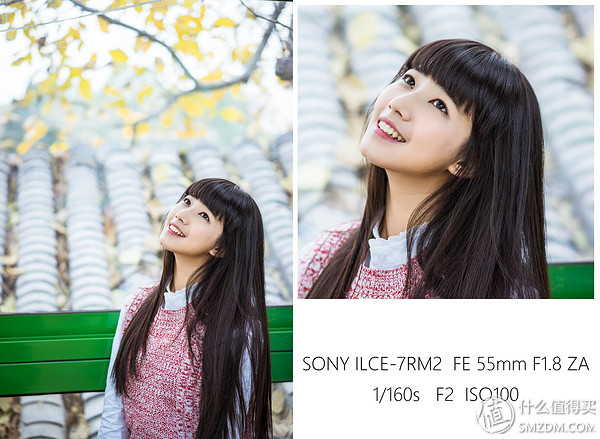
In this photo, the sister paper is slightly on the side, and the two eyes are not in the same focal plane. So shrink the aperture to F2 so that the depth of field is just enough to cover both eyes. The F2 aperture is basically a zero-limit aperture with both eyes. Looking closely, it can be found that some of the right eye has actually begun to drift away from the depth of field. And all these subtle changes in the depth of field have become extremely simple under the support of the WYSIWYG (What You See Is What You Get) A7R2.
4.3 White Balance
Frankly speaking, I used to stay in automatic white balance for a long period of time without changing my white balance. The adjustment of white balance depends more on post-production. However, in order to reduce some of the later workload, but also to give customers the best original film, I had to bite the bullet and put the white balance in the early stage to deal with. When I did this, I discovered that the original white balance adjustment was not as difficult as I thought. "WYSIWYG" not only affects exposure and depth of field, but also affects white balance. Therefore, the control of the white balance in the early stage also becomes simple, and the quality of the original film can be instantly improved. Only after mastering this skill, my photos rarely make a serious late period. Try to control the color by adjusting the white balance in the early stage. In the later period, just do some simple repairs.

SONYILCE-7RM2 FE 50mm 1.4ZA 1/640s F3.2 ISO100 Manual White Balance Color Temperature 4700 Original
5, a new era of smart cameras
The reason why smartphones can subvert the function machine in the past is relying on unlimited APP expansion capabilities. Making mobile phones not only a tool for making calls and sending text messages, but also a tool that affects all aspects of our lives and even replaces a large part of the computer's functionality. Nowadays, the camera is also the same, through the rich and varied APP to make some of the original complex shooting techniques simple, even for beginners can instantly grasp the high-level techniques. The emergence of SONYPLAY MEMORIES CAMERA APPS will put the camera in a smart new era.
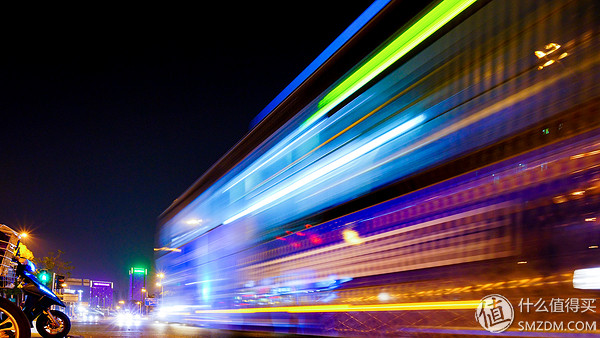
5.1 Waved shutter
A simple wave can trigger the camera shutter. When shooting with a slow shutter that requires a tripod, this feature is enough to replace the shutter release, allowing the camera to truly zero vibration.

5.2 time-lapse shooting
As we all know, time-lapse photography is a process that requires taking a large number of photos and post-production into a dynamic video. Therefore, the shooting of time-lapse photography involves the use of shutter lines, as well as a large amount of experience, to determine the subject of their shooting needs a few seconds interval shooting. However, with the time-lapse application APP, all this has become very simple, the APP presets to focus on common topics, also supports custom settings, and the final synthesis of dynamic video directly in the machine, so that everything becomes simple.
App default themes are cloudy, night sky, night scene, sunset, sunrise, miniature landscape, standard, custom and so on.

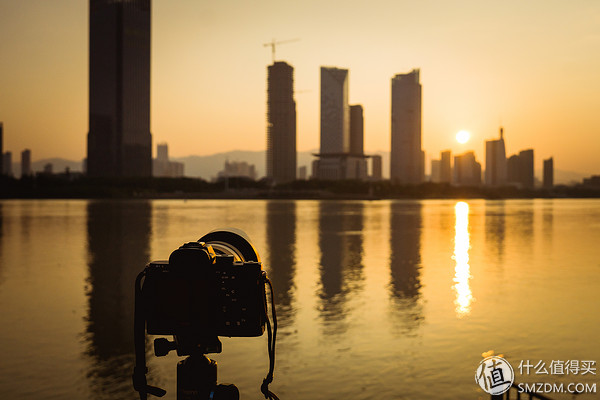
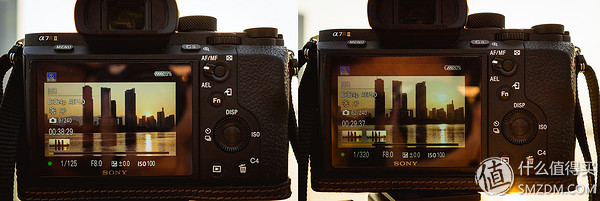
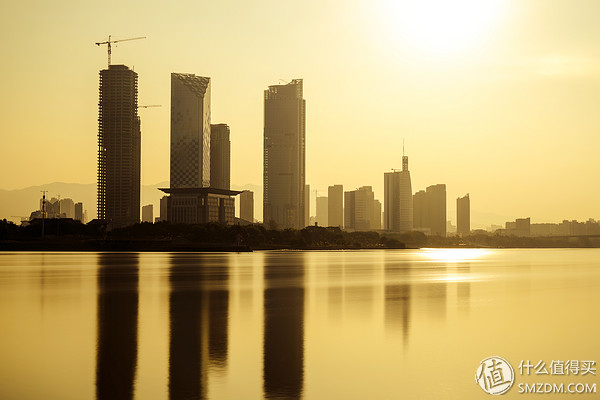
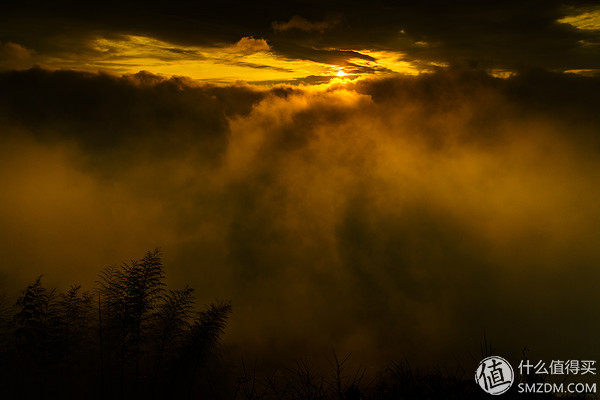
Take the sunrise as an example. After fixing the camera on a tripod, open the time-delay shooting APP, set the sunrise mode in the theme mode, and press the shutter button directly. The system will automatically output the sunrise dynamic video. It is as simple as that.
In sunrise mode, the camera takes a shot of 9 shots at a default interval of 9 seconds and plays 24 shots per second. Exposure does not lock, that is, you can automatically change the exposure parameters according to the light intensity changes. Take this shot as an example. When shooting the ninth shot, the exposure combination is 1/125s, F8, and ISO100. Ten minutes later, the intensity of the sunlight is higher, so the exposure combination is reduced to 1/320S, F8, ISO100.
Attach this video of the Sunrise video: Time-lapse photography in cloudy mode.
Time-lapse photography taken with miniatures.
5.3 Smooth reflection
Slow shutter photography for replacing ND. Usually in the daytime, if you want to take a slow-shuttered landscape that looks like a mirror on the surface of the lake, you need to reduce the light with ND. But with smooth reflections, you don't need an ND, and you can take a slow shutter effect. The working principle is to capture a large number of photos and superimpose them into a mirror effect through software algorithms.
The smooth reflection APP also presets several common topics, including night reflection, water flow, silence, smoke, monochrome, and custom patterns.
Taking silence as an example, when the smoothing mode level is set to the highest HI (LO, MID, and HI are optional), the camera takes 128 shots by default (up to 256 in custom mode), and the exposure is locked for synthesis.


SONY ILCE-7RM2 FE 24-70mm F2.8 GM 1/125s F8 ISO100 70.0 mm
SONY ILCE-7RM2 FE 24-70mm F2.8 GM 1/1250s F8 ISO100 50.0 mm
5.4 Multiple Exposure
The traditional multiple exposure mode has too many uncertainties, because it is difficult for the photographer to see the result intuitively, and it takes a lot of shooting experience to imagine. However, with the multiple exposure of the APP, the situation is different. In addition to presetting common multiple exposure topics, the camera can directly preview the final output. This greatly reduces the difficulty of multiple exposures, and can be continuously adjusted to achieve the best results during the shooting process.
Multiple exposure preset topics include filters for sky, mirror, texture, soft focus, rotation, mirroring, and manual.
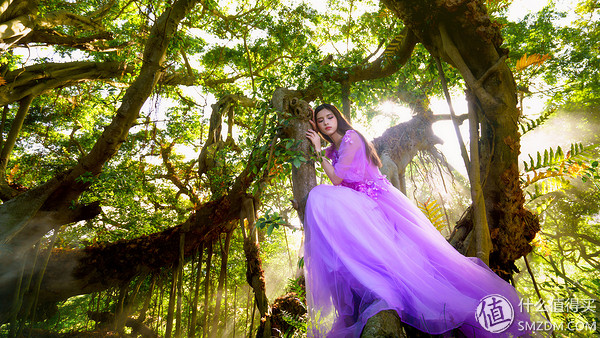
Sky filter. Taking the background of the sky as the main subject, two photos were taken successively, and the background of the APP was automatically superimposed into a photo.
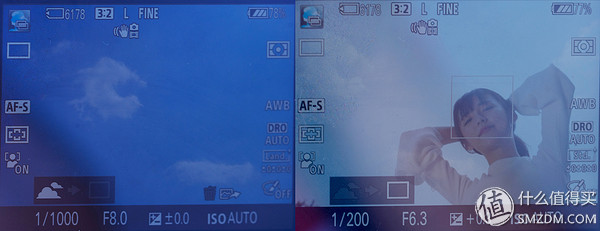
The first shot is aimed at the sky, and the APP will automatically give the appropriate exposure according to the preset. The second shot is aimed at the character, and the APP automatically recognizes and gives an exposure compensation of 0.3. In the shooting process, the aperture value can be adjusted to obtain an appropriate depth of field. Especially when shooting the second shot, you should pay special attention, because you can preview the effect of the final output on the viewfinder in real time, so you should pay attention to the position of the portrait prevention in order to get the desired effect. In this case, it is deliberately to avoid superimposing the face and white clouds so as not to affect the display of the face.
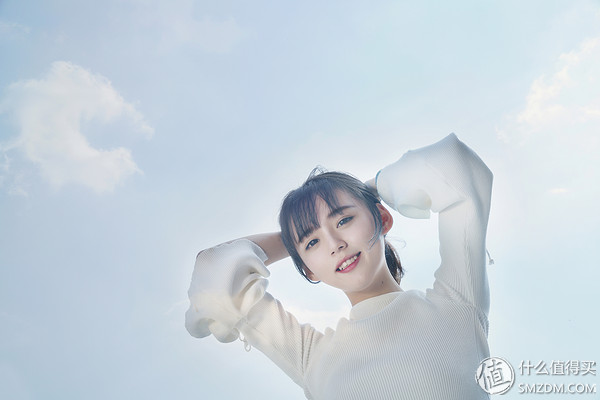
SONY ILCE-7RM2 FE 24-70mm F2.8 GM 1/125s F8 ISO100 70.0 mm
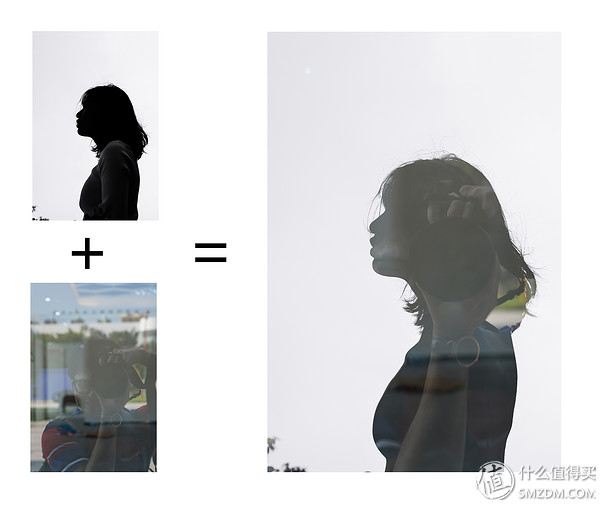
Silhouette filter. Taking the first picture is that APP will automatically lower the exposure compensation to get a severely degraded silhouette, while the second picture is normal exposure, and the two pictures are superimposed into a dreamy silhouette.
5.5 Summary of this section
A7R2's PLAY MEMORIES CAMERA APPS far more than these four APP, there are other more and more fun APP. This is where A7R2's charm lies. It not only simplifies many traditional photographic techniques, but it also enables many new and interesting ideas. However, the most important thing is that APP is a set of software that is constantly being updated and developed. As long as the brain hole is large enough, there are countless APPs joining in, opening up another door for photography. Finally, it is worth mentioning that as long as these apps are Sony cameras, they can be basically used regardless of the model.
6, this chapter summarizes
A lot of space in front of it mainly introduces the new operating habits brought by the A7R2 for photography, such as the eye-control cooperation center, to complete most of the shooting requirements; the edge of the wide focus area of ​​the composition of the experience; super simple and reliable intelligent capture The M file that is the easiest to get started with, and the unlimited possibilities that the camera app brings. The change of these operating habits is a great boon for senior photographers and ordinary users.

Why I used to be a Canon user, I turned back to Sony's embrace. Because in recent years, Sony has always had black technology. I love photography and I also like to play with equipment. I am old and new, and I have no resistance to the trendy and fun camera. Therefore, Sony and I were in love with each other, and we were tempted to continue to launch black technology to satisfy me. It also made me taste the true meaning of three generations of photography.
1, universal digital back
No door, no pie, almost all the shots can be transferred. More importantly, autofocus is also available. Currently, there are AF adapters for connecting Canon EF, Nikon F, Leica M, and Contax G, as well as many manually-adjustable adapters that do not have names. In particular, Canon's adapter ring, when using metabones4 and Sigma MC-11, has almost matched the focusing experience of the original FE bayonet. Many people spit out Sony Ericsson's camera lens, which is small and expensive. It doesn't matter. Everyone can look a bit further and step out of the bottleneck of the FE port. You will find a brighter future. No guns, no runs, Canon made for us.
SONYILCE-7RM2+ only 2 generation adapter ring + Canon EF85mm F1.2 LII 1/125s F2.2 ISO640
SONY ILCE-7RM2+ Only 2nd generation adapter ring + Canon EF24-70mm F2.8 F1.2 LII 1/40s F16 ISO50
Before Sony introduced FE24-70 2.8GM and FE85 1.4GM, Canon's 2470 and 85 were used as my main lens for a long time.
2. Still image shooting with no focus
The focusing principle of the A7R2 is to first estimate the phase quickly, and then compare the precise focus, which is the so-called hybrid focus. In theory, this focusing method is never going to focus, which is where it is. However, in reality, there are often cases where the focus is not on. There are two main reasons. First, it may be too fast, the camera focus algorithm is slower, and smart focus prediction is not accurate. The second is that the speed of the motor driven by the lens itself is not fast enough, and it is always difficult to keep up with the speed of the target position change. In short, moving too fast, focusing can not keep up. However, the shooting of still images does not have this problem. It is absolutely accurate and there is no coke phenomenon. Therefore, shooting scenes, sketches, or posing as the main photo, A7R2 can be as good as fish.

SONY ILCE-7RM2+ FE 85mm F1.4 GM 1/30s F2 ISO1250
3, five axis anti-shake
For a long time in the past, whether the lens has anti-shake function, but also often as a selling point to upgrade a lens. But if you have A7R2, you no longer have to pay extra for the anti-shake feature. Any camera with A7R2 comes with its own anti-shake function. Any lens, not the original lens can be.
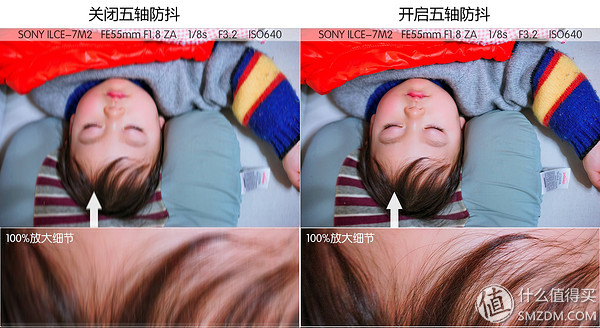
Please forgive me for lazily using a previous A7M2 5-axis anti-shake evaluation that was shot. The effect of A7R2 is also obvious, with a 4.5-stop image stabilization level, which can effectively reduce the safety shutter.
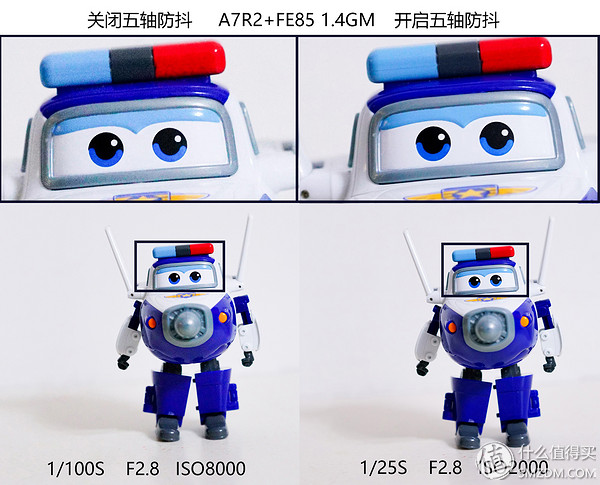
In the same environment, the same exposure and slower shutter speed mean that a lower ISO can be obtained, making the screen cleaner.
A7R2+FE1635 F4 ZA Shutter 1/3s Aperture F5 ISO 500 16mm
Gorgeous 1/3 second safety shutter, no need for iron hand, five-axis image stabilization can be.
3ã€Latitude
All the time, latitude is one of the skills that Sony CMOS is proud of, and the A7R2 is no exception. Photographs of severely owed flashes when the flash was too late to put in a studio shot served as a demonstration.
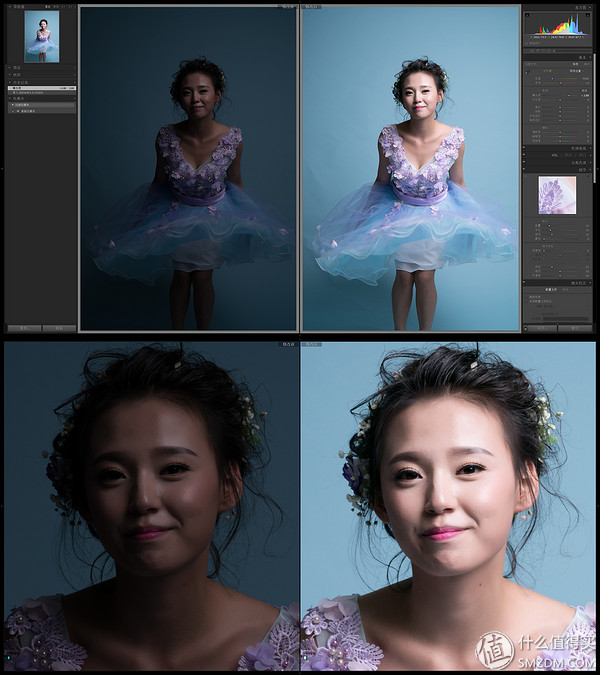
In addition to the 2.8-speed exposure, this photo does not have any operation. It can be seen that no noise appears in the shadow detail or highlight details after 100% magnification. In fact, according to my personal experience, the exposure range of the A7R2 is between -3EV and +3.5EV, RAW is free to pull, and there is almost no picture quality degradation. However, when this range is exceeded, the loss of picture quality is more serious.
4, the pixel is justice
Many people think that high-pixel useless, 2000W pixels is enough. This has continued from the 1200W pixel era until now, but with the advancement of technology, pixels are constantly improving. This is an indisputable fact. It is also a fact that high pixel quality is a factor. Of course, there are many factors that determine the quality of a camera. Pixels are not the only value, but pixels are at least a very important indicator. Although some people still insist on high pixel uselessness, in fact, most of these people do not really enjoy the high pixel pleasure.
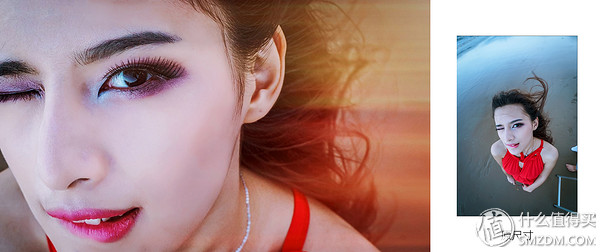
At first glance is not a close-up shot like a macro lens? In fact, this is the use of FE16 35 16-shot, see the size of the original picture, is not it start to marvel at the charm of 4240W pixels. Unparalleled detail, and unlimited possibilities for secondary composition space.
Chapter 4 Flash SolutionsAlthough the A7R2's flash system is behind, it does not mean that it cannot be shot with pleasure. Although the original factory did not give us the ideal flash system, we also have a sub-factory solution. Take the author as an example, I use Nisshin air1+DI700A as hot shoe solution; use high-energy K4T as external lighting solution; use Kimbe and Shenniu 600W power shed light + Sony MI port into Canon hot shoe + Canon flash unit; I even used the former Canon Port legacy 568EXII hot shoe. In short, everything is extremely useful.
1, hot shoe program
Nissin AIR1+DI700A. Support TTL, support high-speed synchronization, does not support rear-curtain synchronization, strobe.这个是应该是我目å‰æé…A7R2使用最多的闪光ç¯ã€‚å› ä¸ºè¿™ä¸ªæ˜¯ç¬¬ä¸€ä¸ªæŽ¨å‡ºæ”¯æŒç´¢å°¼TTL和高速åŒæ¥çš„æ— çº¿å¼•é—ªæ–¹æ¡ˆï¼Œæ‰€ä»¥æˆ‘ç¬¬ä¸€æ—¶é—´åƒäº†è¿™ä¸ªèžƒèŸ¹ï¼Œæ„Ÿè§‰è¿˜ä¸é”™ã€‚是我的摄影包必备工具之一。

ILCE-7RM2 + FE55mm F1.8 ZA 1/250s F2.8 ISO100
A7R2的闪光ç¯æœ€é«˜åŒæ¥é€Ÿåº¦1/250s,基本上è½æ—¥é€†å…‰å¸ƒå…‰æ—¶ï¼Œè¿˜æ˜¯å¾ˆè½»æ¾å¯ä»¥å°†å¿«é—¨é€Ÿåº¦åŽ‹ä½Žåœ¨1/250s之内的,以至于我很少用到高速åŒæ¥ã€‚最é‡è¦çš„是,çƒé´è¿™ä¸ªçº§åˆ«çš„闪光ç¯ï¼Œé«˜é€ŸåŒæ¥çš„è¾“å‡ºåŠŸçŽ‡å ªå¿§ï¼Œæ‰€ä»¥è¿˜æ˜¯å°½é‡æŠŠå¿«é—¨æŽ§åˆ¶åœ¨1/250S之内å而会更好一些。而且用它æ¥å…‰å¼•é—ªåˆ«çš„闪光ç¯æž„建多ç¯ä¹Ÿä¸é”™ã€‚比如我用æ¥å¼•é—ªäº†æ°¸è¯º568EXII。

SONYILCE-7RM2+FE 24-70mm F2.8 GM 1/80s F3.5 ISO400 70.0 mm
æ¤å¤–最近å‘布的神牛X1S引闪器,æé…神牛的闪光ç¯ä½¿ç”¨åº”该也错。也许哪一天我也会è´å…¥ä¸€ä¸ªè¯•è¯•çœ‹ã€‚
2ã€å¤–æ‹æ–¹æ¡ˆ
高能ABC引闪器+高能K4T。ABC引闪器也有索尼版,支æŒTTL和高速åŒæ¥ã€‚

图为3ç›é«˜èƒ½K4T+2ç›è€æ€680A五ç¯æ‹æ‘„,高能K4T用ABC引闪器触å‘,而è€æ€680A则使用光引闪触å‘。

SONYILCE-7RM2+FE 24-70mm F2.8 GM 1/100s F4 ISO100 32.0 mm
æ¤å¤–神牛ã€profotoç‰å“牌也有相应的支æŒç´¢å°¼ç³»ç»Ÿçš„外æ‹ç¯ã€‚有兴趣的朋å‹å¯ä»¥åŽ»äº†è§£ä¸€ä¸‹ã€‚
3ã€æ£šæ‹æ–¹æ¡ˆ
这个其实å而是最简å•çš„ï¼Œå› ä¸ºæ£šæ‹å…¨æ˜¯æ‰‹åŠ¨æ¨¡å¼ï¼Œæ‰€ä»¥ä»»ä½•å¼•é—ªå™¨å‡æ”¯æŒç´¢å°¼çƒé´å£ã€‚哪怕是佳能å£çš„引闪器强行æ’入也没问题。如果实在担心把爱机给弄åçš„è¯ï¼Œå¯ä»¥ä¹°ä¸ªçƒé´è½¬æ¢å™¨ã€‚
1942c978af7943af227.jpg" />
所以我的摄影棚使用的棚æ‹ç¯ä¾ç„¶æ˜¯ä»¥å‰ç”¨ä½³èƒ½æ—¶é—留的金è´å’Œç¥žç‰›é—ªå…‰ç¯ã€‚åæ£éƒ½æ˜¯æ‰‹åŠ¨æ‹æ‘„了,所以暂时没有å‡çº§æ¬²æœ›ã€‚下图就是金è´+神牛3ç¯æ‹æ‘„,具体型å·å®žåœ¨è®°ä¸ä½äº†ã€‚总之很便宜的,一åƒå·¦å³ï¼Œ600Wçš„ç¯å°±å¯¹äº†ã€‚
SONY ILCE-7+FE 24-70mm F2.8 GM 1/125s F8 ISO100 52.0 mm
ç¬¬äº”ç« åŽŸåŽ‚é•œå¤´ç¾¤ä¹Ÿè®¸æ˜¯ä¸ºäº†å–‚é¥±A7R2çš„4240Wåƒç´ ï¼Œç´¢å°¼è¿™å‡ å¹´éƒ¨ç½²çš„FE镜头就没有分辨率ä¸å¥½çš„。就算是FE28 2.0è¿™ç§ä½Žç«¯é•œå¤´ï¼Œåˆ†è¾¨çŽ‡ä¹ŸåŒæ ·æƒŠäººã€‚è¿™ä¹Ÿæ˜¯æˆ‘ä¸ºä½•ä¹‰æ— åé¡¾æ”¾å¼ƒè½¬æŽ¥ä½³èƒ½é•œå¤´ï¼Œå…¨å¥—ä½¿ç”¨ç´¢å°¼çš„é•œå¤´çš„åŽŸå› ã€‚æ¯•ç«Ÿä½³èƒ½çš„å¾ˆå¤šé•œå¤´å®žåœ¨å¤ªè€äº†ï¼Œå–‚ä¸é¥±4240Wåƒç´ 。至于索尼原厂镜头群,我åªèƒ½è¯´éƒ½å¤ªæ¯’了,就ä¸ä¸€ä¸€å±•å¼€ç‚¹è¯„了,å¦åˆ™è¿™ç¯‡æ–‡ç« 两万å—都收ä¸äº†å°¾ã€‚在这里我åªåˆ—ä¸¾å‡ ä¸ªè¿‘æœŸä½¿ç”¨çš„é•œå¤´ä¸ï¼Œè®©æˆ‘惊å¹çš„ä¸€äº›é•œå¤´ç´ è´¨ã€‚
1ã€FE50 1.4ZA优秀的紫边控制能力
1.4大光圈的镜头,都有一个共åŒçš„ç—›ï¼Œé‚£å°±æ˜¯ç´«è¾¹ã€‚ç‰¹åˆ«æ˜¯å¤§å…‰æ¯”çŽ¯å¢ƒä¸‹ï¼Œç´«è¾¹çš„å‡ºçŽ°å‡ ä¹Žæ˜¯å¿…ç„¶çš„ã€‚FE 50mm F1.4 ZA在追求分辨率和虚化的åŒæ—¶ï¼ŒåŒæ ·å…¼é¡¾äº†ç´«è¾¹çš„控制能力。虽说ä¾ç„¶æ— 法彻底消除紫边,但实æ‹ä¸‹æ¥ç´«è¾¹çš„表现已ç»éžå¸¸è½»å¾®äº†ã€‚

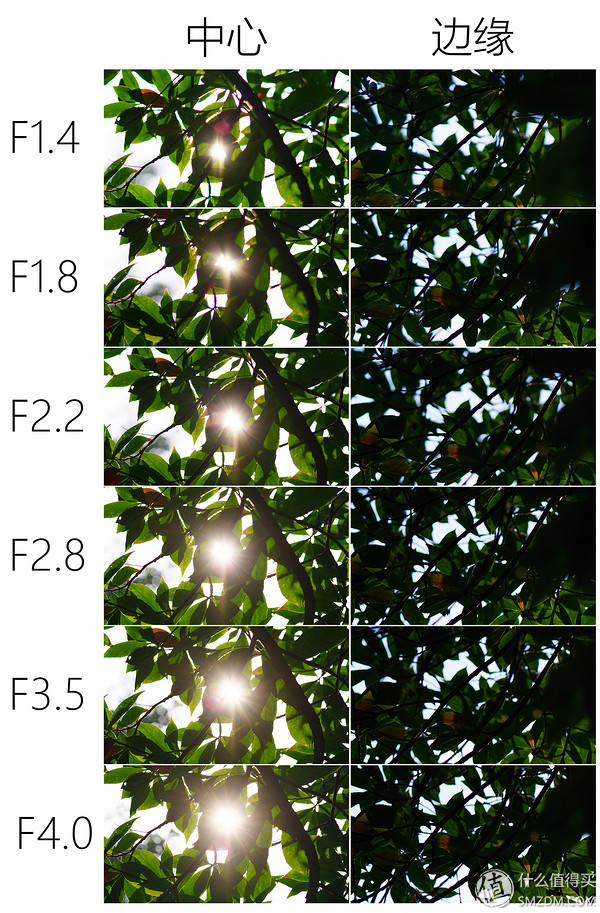
SONY ILCE-7RM2+FE 50mm F1.4 ZA 1/5000s F1.4 ISO100
从上é¢å„大光圈截图å¯ä»¥çœ‹å‡ºï¼Œå³ä¾¿æ˜¯åœ¨1.4光圈全开的情况下,紫边现象也ä¸ç®—严é‡ã€‚属于åŽæœŸå¯ä»¥è½»æ˜“消除的程度,甚至ä¸ç”¨åŽæœŸï¼Œåªè¦ä¸æ˜¯100%截图都很难察觉。简å•çš„æ¥è¯´ï¼Œå°±ç®—é¢ä¸´é«˜å差的场景,这是一枚让人放心æ‹æ‘„的镜头。
2ã€FE24 70 2.8GMçš„æ— æ•ŒæŠ—çœ©å…‰
所谓眩光就是镜头直接对ç€é˜³å…‰æ‹æ‘„时,很容易产生白茫茫的一片。而优秀的镜头,则是å¯ä»¥æœ‰æ•ˆæŠ‘制眩光的产生。GM系列镜头,å·ç§°ç´¢å°¼æœ€é«˜ç«¯çš„镜头,虽然没有蔡å¸T镀膜ä¿é©¾æŠ¤èˆªï¼Œä½†æŠ—眩光能力åŒæ ·å分惊人。

SONY ILCE-7RM2+ FE 24-70mm F2.8 GM 1/160s F8 ISO100 24 mm

SONY ILCE-7RM2+ FE 24-70mm F2.8 GM 1/1600s F8 ISO100 70mm
å¯ä»¥çœ‹åˆ°ï¼Œæ— 论是在24端,还是70端,FE 24-70mmF2.8 GM都å¯ä»¥å‹‡æ•¢ç›´è§†å¤ªé˜³ï¼Œè€Œä¸ä¼šå‡ºçŽ°çœ©å…‰æˆ–者鬼影。
3ã€é€æ¸æˆç†Ÿçš„镜头群
从2013å¹´çš„A7å‘布开始,三年的时间内索尼已ç»æ‹¥æœ‰FE镜头18枚,平å‡æ¯å››ä¸ªæœˆå°±æœ‰ä¸€åªæ–°é•œå¤´å‘布,基本涵盖了目å‰å¸‚场上的主æµæ‹æ‘„需求。而且æ¯ä¸ªé•œå¤´çš„ç´ è´¨éƒ½å¾ˆèµžï¼Œä¸€å®šè¦è¯´ç¼ºç‚¹çš„è¯ï¼Œå°±æ˜¯å¤ªè´µäº†ç‚¹ã€‚如果我说贵的有é“ç†ï¼Œä¸€å®šä¼šæ‹‰å¾ˆå¤šçš„仇æ¨ã€‚所以在这里,我åªä¼šè¯´ï¼Œç´¢å°¼å¤§æ³•ï¼Œç½ªæ¶æ»”天。
第å…ç« æ€»ç»“A7R2上市一年,消费者从质疑,到接å—,身边已ç»è¶Šæ¥è¶Šå¤šå½±å‹è´å…¥è¿™æ¬¾ç›¸æœºã€‚虽然A7R2的写入速度让人æ‹ç…§åƒä¾¿ç§˜ä¸€æ ·éš¾å—,但å´æ‹¥æœ‰ç›®å‰å…¨ç”»å¹…市场上最好的画质ã€ä¸ä¸Šæ°´å‡†çš„对焦速度åŠæŠ“æ‹èƒ½åŠ›ã€è¿˜æœ‰è®©äººæ¬²ç½¢ä¸èƒ½çš„眼部对焦。总的æ¥è¯´ï¼ŒA7R2带æ¥çš„快感远大于é—憾,是一å°å€¼å¾—ä¹°çš„ç»å…¸æœºå™¨ã€‚最åŽæ˜¯æ”¾æ¯’环节,æ¯åªé•œå¤´è´´ä¸€å¼ 。

SONY ILCE-7RM2 FE 85mm F1.4 GM 1/500s F1.4 ISO100

SONY ILCE-7RM2 FE 24-70mm F2.8 GM 1/80s F2.8 ISO500

SONY ILCE-7RM2 FE 50mm F1.4 ZA 1/60s F1.4 ISO1000

SONY ILCE-7RM2 FE 35mm F1.4 ZA 1/250s F2.2 ISO125

SONY ILCE-7RM2 FE 55mm F1.8 ZA 1/50s F1.8 ISO500

SONY ILCE-7RM2 FE 28mm F2 1/250s F2.2 ISO2000
SONY ILCE-7RM2 FE 24-240mm F3.5-6.3 OSS 1/400s F8 ISO100 24.0 mm
SONY ILCE-7RM2 FE 16-35mm F4 ZA OSS 1/80s F4 ISO250 16.0 mm

SONYILCE-7RM2 FE 70-200mm F4 G OSS 1/640s F4 ISO80 200.0 mm

SONYILCE-7RM2 FE 90mm F2.8 Macro G OSS 1/60s F9 ISO100